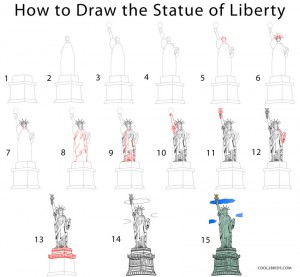
Historical landmarks always make nice subjects for drawing projects as they allow you to test your artistic skills while letting you find out lots of fun facts about the particular place. The statue of Liberty, often considered the most famous historical site and architectural landmark of New York and the United States, is of course no exception. Here is an easy step-by-step drawing to help kids make a realistic Statue of Liberty picture.
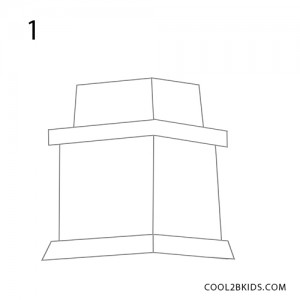
Step 1
- Begin the drawing with the easiest part. See the picture to make the pedestal with simple geometric shapes.
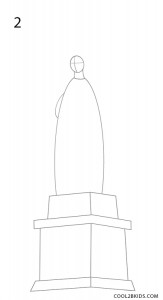
Step 2
- Now, make a rough oval shape for the outline of the statue’s body, followed by a small circle for the head. Join the two shapes with two small lines forming the neck part. (See picture 2)
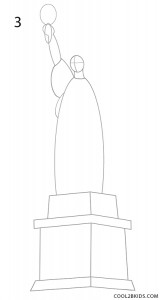
Step 3
- Now follow the above picture to draw the outlines for the right hand holding the torch.
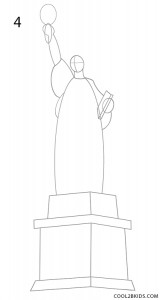
Step 4
- Now this might be a little tricky; draw the left sleeve followed by the folded arm before drawing a rectangle for the tablet (tabula ansata) in her hand.
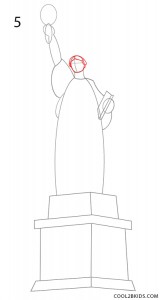
Step 5
- Work over the outline made for the head to draw the middle parted hair and the base of the crown.
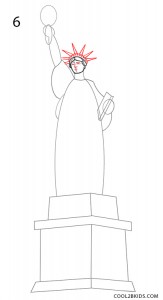
Step 6
- Next, use a ruler to draw the iconic crown, with seven rays forming a halo.
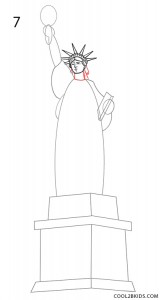
Step 7
- See the picture to draw the few visible locks of hair.
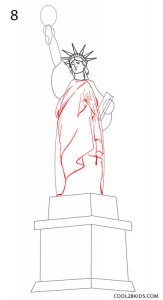
Step 8
- Now, work over the large oval shape made for the body to draw the folds of her robe.
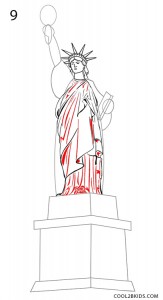
Step 9
- Check the picture above to add a few more details to the robe of your Statue of Liberty to make her look more realistic.
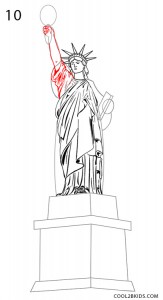
Step 10
- See picture 10 to draw the right arm, using the outlines made in step 3 as your guide.
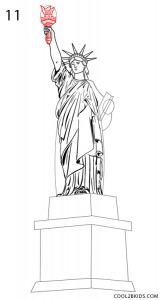
Step 11
- Draw the lit torch as shown in the picture above.
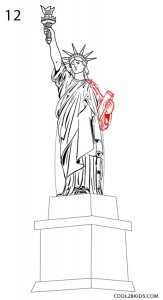
Step 12
- Similarly, work on the left arm holding the tablet and your statue is done. Also, don’t forget to erase any unnecessary lines from the earlier outlined drawing.
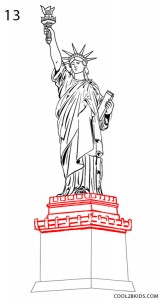
Step 13
- Now, it is time to draw the intricate details to complete the outlined pedestal. Begin as shown in picture 13.
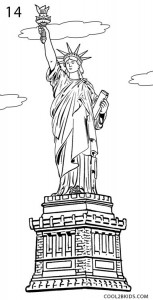
Step 14
- Finish your drawing by working on the rest of the pedestal as shown in picture 14.
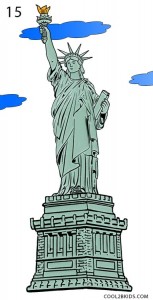
Step 15
- Your drawing is almost finished as all that is left to do is to add some colors. See the above picture to choose a nice shade of bluish grey and fill the picture, making sure to remain within the lines.
It may take a few attempts to perfect your drawing as the subject you have chosen is not really easy. But, with a little practice, you will be an expert in drawing the Statue of Liberty. Now, how about trying your hand at some other historical site? The Eiffel Tower maybe?



jessica i love how you draw
wow good job i did a inquriy project thx
cool but im a horrible artist and it didnt come out the way i wanted it to
Cool but to complicated………….. and I’m a horrible artist……………… and it didn’t come out the way I wanted to………. you also are a very good artist.
amazing, but I’m a horrible artist and it didn’t look anything like those beautiful drawing steps. I was doing a project. Nice job, though!
i was doing a school project and it looks exactly like the pictures and how I planned it to be. THX!
it be cool…………but i am a decent artist and it was still pretty complicated.
i am a rlly good drawer, dont mean to brag, but for a good drawer to say dis, thissss is rlly HHHHHHHAAAAAAAAAAAAAARRRRRRRRRRRRRRDDDDDDDDDDDDD
Nice job! It looks really good, I wish I could draw that good. 🙂
I liked it and all, but it was way to hard. this is supposed to be a website that kids can use to draw. But still, you are an amazing artist.