Dinosaurs, the amazing prehistoric creatures to inspire countless adventure science-fiction stories, can be a fun subject for kids’ art projects. However, drawing a dinosaur can be quite tricky as you would not know where to begin. Check out the easy step-by-step instructions for drawing a neat dinosaur.
Step 1
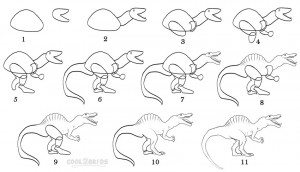
- Start your drawing with a rough triangle with rounded corners as shown in picture 1. Make it as big as you want your dinosaur’s body to be.
- Now draw a “C” with a small “V” blocking its open side (like a Pacman with an elongated body) for the head (picture 1). The “V” will later become the open mouth while the curvy line inside the “V” will be the tongue.
- Join the outlines of the body and head with two curved lines (as shown in picture 2) for the long neck. Then make draw the only visible eye (the tiny circle).
- See picture 3 to draw an oval over the lower part of the triangle made for the body, followed by a left-facing half moon at the point where the neck meets the body.
Step 2
- Add another oval just below the one you made in the earlier step. These will later fuse together to form the hind leg of your dinosaur.
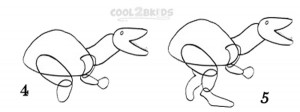
- See picture 4 to draw an oblong shape touching the half moon drawn in step 1, followed by a small roundish shape (outline of the claw).
- See picture 5 to draw the lower part of the right leg and the partially visible left leg.
Step 3
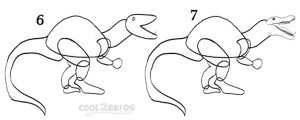
- Draw a small rough triangle for the outline of the left hind claw (picture 6).
- Now, draw the long, muscular tail as shown in picture 6.
- Next, work over the elongated Pacman figure drawn for the head to make it look more realistic with sharp teeth and a long tongue (picture 7).
Step 4
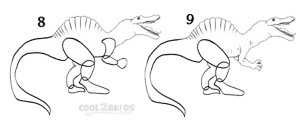
- Redo the roundish triangle you drew in step 1 to draw the ridged back of you dinosaur (picture 8). Also, erase the parts of the body cutting through the neck and tail.
- See picture 9 to work on the small forelimbs and claws. Make sure to erase the outlined drawing once they are done.
Step 5
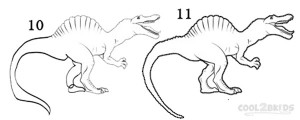
- Now it is time to work over the outlined right leg as shown in picture 10, followed by drawing the left leg in the same manner (picture 11).
- Now all that is left to do is redoing the tail to give it a muscular, ridged appearance (picture 11).
See the final picture to add a few small lines for the final touch that would make your picture look more real.




Could you please create a tutorial on “How to Draw a Skeksis”from a 1982 classic movie the Dark Crystal for young fantasy artists ages 9 to 12 on April 19,2022?