A dream catcher or dreamcatcher can be the perfect subject for a Thanksgiving holiday art project. Apart from making an actual one, you can also try your hand at a nice and light dream catcher drawing; follow the step-by-step instructions and the job becomes much easier.
Step 1
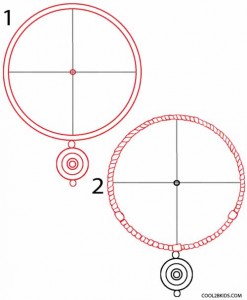
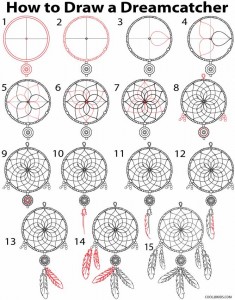
- Use a compass and draw two neat circles with a common center, one inside the other, as shown in Picture 1.
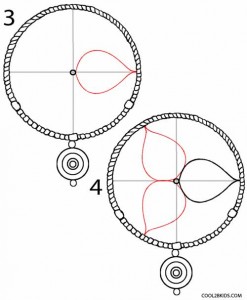
- Now make two straight lines across the diameter, making a 90° angle at the centre of the circles. Note how a small circle or ‘bead’ has been made to mark the center. Also make three smaller circles with a common center, attached to the larger hoop.
- Now, fill the narrow space between the two large circles with tiny lines (Picture 2) to give it a woven or beaded look. Note the three larger ‘beads’ have been made
Step 2
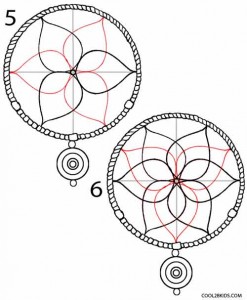
- Check Picture 3 to start working on the woven net within the hoop. Use the straight line (across the diameter) drawn in the earlier step to draw a petal-like shape on the right side of the circle.
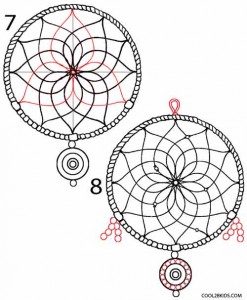
- Now, draw two more similar petal-shapes as shown in Picture 4.
Step 3
- Like you did to draw the first right side petal, use the line in the left half of the circle to draw a similar petal shape exactly opposite to the right one (Picture 5).
- Next, check Picture 6 carefully to see how the same has been done to draw another petal keeping the line in the lower half of the circle as its axis. Make two more petals as you did in step 2. All the overlapping petals are creating a pretty impressive web, aren’t they?
Step 4
- At this point, it might look confusing, but look carefully (Picture 7) and you will see how the line in the upper half of the circle has been used to make a fourth, similar petal. Now make the last two petals to complete this fourth three-petal set.
- Now, draw a small hoop at the top of the dreamcatcher, you know, the one used for hanging it. Also, make beaded hanging on its sides, as shown in Picture 8.
Step 5
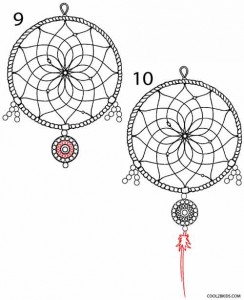
- See Picture 9 and adorn the rest of the lower hanging hoop.
- Fill the smaller circles in the decorative hanging as shown in Picture 9 and then start working on a long feather from its lower end (Picture 10).
Step 6
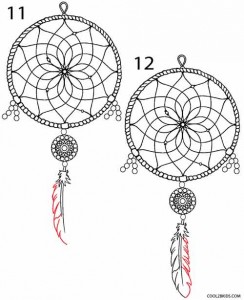
- Complete the feather as shown in Pictures 11 and 12.
Step 7
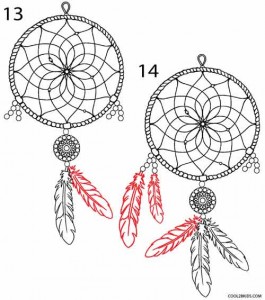
- Follow the next pictures to draw some more feathers attached to the beaded lines made in step 4. These feathers are what will give your dreamcatcher a traditional look.
Step 8
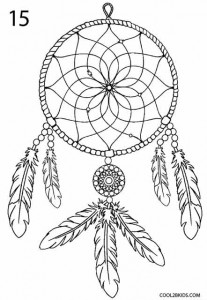
- Make two more feathers on the right side and your drawing is complete (Picture 15).
Once the basic picture is complete you can experiment with further feathers, hoops and beads to make a more complex and elaborate dreamcatcher. Filling the feathers and the woven net with vibrant shades will also be fun.



I really enjoyed drawing this. Very easy instructions to follow.
Very easy instructions! I loved drawing my dreamcatcher. Now I feel like a true artist.
This inoaimftron is off the hizool!
this works really good its aa very nice drawing if yoi do it right but it is really easy to draw it right because te instruction are simple to fallow.
You’ve captured this pereyctlf. Thanks for taking the time!
This was the easiest dreamcatcher i have ever followed
This is the most easiest way to draw a dreamcatcher rather than being stuck at just drawing a good circle.
I cant believe that you think this is the easiest way to draw a dream catcher.Then again like I said Im not the most artistic person on the face of the earth. Im a high school student just trying to pass art class
For someone who is not an artistic person in this sort of fashion this is very complicated and im better in art things like making vision boards,power points and things of that sort.Sometimes I wish i was artistic like this..:(:(:(:(:(:(