Bugs Bunny, the iconic cartoon character from the 1940s popular series Looney Toons, has entered the world of children’s art, being one of the most sought after coloring page and how to draw subjects. Here is an easy step-by-step full body picture of Bugs Bunny. All you need to do is follow the instructions and you will end up with a neat drawing of your favorite character.
Step 1
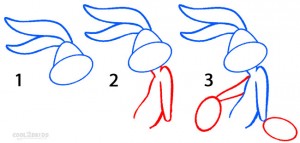
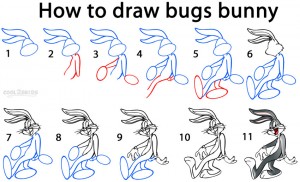
- Begin your drawing with an oval for the outline of your Bugs Bunny’s nozzle and mouth part (picture 1).
- Next, draw a downward facing “C” for the forehead followed by two long rabbit ears as shown in the picture.
- See picture 2 to draw the outline of his upper body and left arm (the red line marks the new steps)
- Now, draw the outline for the right arm as you did the other one in step 1, followed by a small oval at the end of each arm for the hands (picture 3)
Step 2
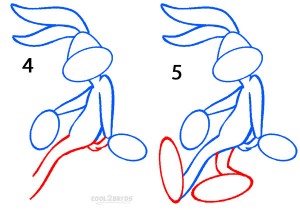
- Check out the next picture (picture 4) to draw the left leg and the fluffy tail.
- Now, draw the other leg and two ovals for your Bugs Bunny’s two large feet as shown in picture 5. You have now completed drawing the outline for your picture.
Step 3
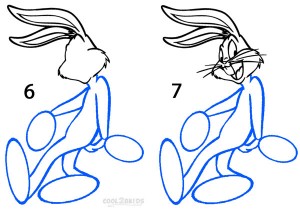
- Work over the large oval and “C” drawn in step one for the nozzle and head to make them look more furry and real. Erase the part of the oval running through your Bugs Bunny’s face (picture 6).
- Draw the double lined ears as shown in the picture
- Now, it is time to work on the face. See picture 7 to draw the characteristic sparkling eyes, whickers and the pair of large rabbit teeth
Step 4
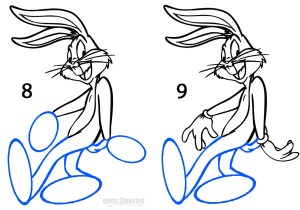
- In this step, you will be working over the outlines of his upper body as shown in picture 8.
- Next, replace the ovals drawn for his hands (in step 1) with the iconic white gloved hands of Bugs Bunny (picture 9).
Step 5
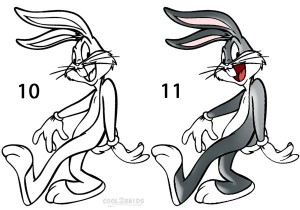
- All that is left to do is to replace the large ovals drawn for the feet with the furry three-toed paws of Bugs Bunny (as shown in picture 10)
- Now comes the fun part as you fill the finished diagram with the right colors (with the help of picture 11), and your drawing is done.



it was vary easy and tuned out great