Who does not love Iron Man in his metal red iron suit and invincible powers, defeating his enemies and saving the day every time? But, he is difficult to manage in the world of art as he is in the crime world, with drawing a neat Iron Man picture being almost as difficult. So, here is a step by step drawing to make your job easy. Now, you can show off your artistic skills at school by making a neat picture of your hero.
Step 1
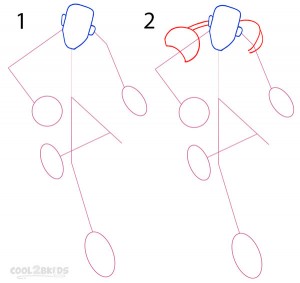
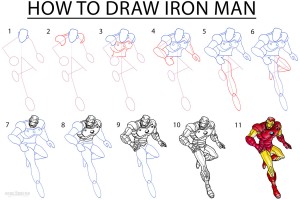
- Check out picture 1 to see how the basic body structure has been made and draw it exactly as it is. The four circles and ovals are for his hands and feet while the lines are for the body, arms and legs.
- Now draw the head as shown in the picture, a small “U” with the arms joined by a small line. Add two small “C”s for the ears.
- Next, move on to picture 2 and draw the shoulders of his metal suit with semicircles or down-facing “C”s.
Step 2
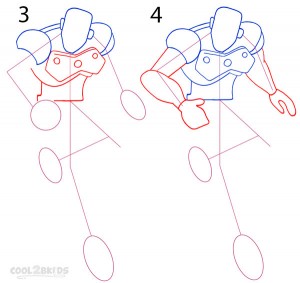
- This part may seem a bit tricky as you need to draw the chest shield and rest of the body of the suit as shown in picture 3.
- Don’t forget to add three circles on the shield that will later become the iconic arc reactor mounted in Iron Man’s chest.
- Now, see picture 4 and work over the straight lines to draw the muscular armored arms. Also, replace the circles for gloved hands.
Step 3
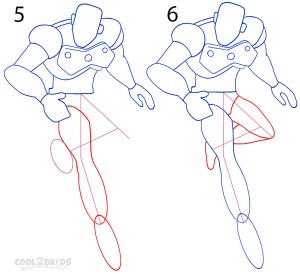
- Next, you will be working on his legs as you replace the basic outline for the right leg with a long peanut shell-like shape (picture 5).
- Draw an oblong shape in place of the oval made for the right foot.
- Now, see picture 6 to draw the left leg and foot (peeking from behind the right leg) as shown.
Step 4
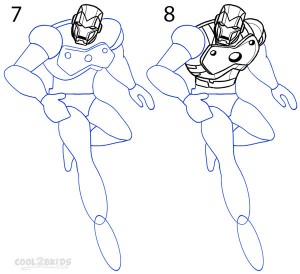
- The basic picture is already done as all that is left now is adding the small details to make your picture more real. Check picture 7 to draw the details in his helmet (the black lines denote the new steps and changes).
- Now, draw the fine details on the body of his armour as shown in picture 8
Step 5
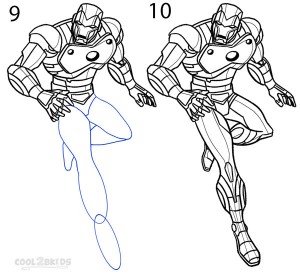
- Check picture 9 to work over the basic drawing of the arms and add the minute metallic details, followed by the armored fingers.
- Your drawing is almost done as the only parts left are the two legs and booted feet. Work on these as shown in picture 10.
Step 6
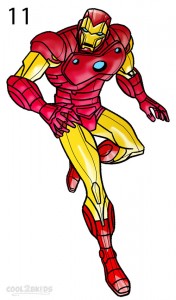
- See picture 11 to fill the drawing with the correct shades and you have now achieved the task of making an accurate picture of the iron hero, Iron Man.

