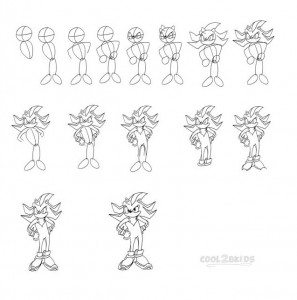
If you thought it would be difficult to draw Sonic the Hedgehog yourself, here are some simple steps for you to accomplish the task:
Step 1
In this step, you will learn to draw the basic outline of the picture:
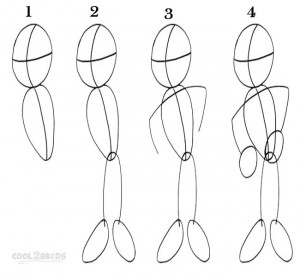
- Begin by drawing a slightly curved cross, leaning on the left. Draw a circle keeping the cross-section point at the center (picture 1). Next, draw a larger oval or egg-shaped curve with the narrow end down for your Sonic’s body.
- Make two curved lines (picture 2) from the narrow end of the oval for his legs and draw two smaller ovals for the shoes
- Make a down-facing ‘c’ with pointy curves for two arms (picture 3)
- Draw a circle at each end of the ‘c’ for the hands (picture 4)
Step 2
Here, you will be working on your Sonic’s face
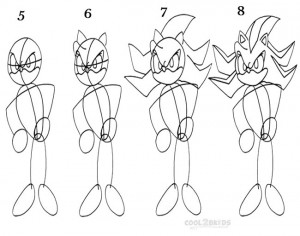
- Draw two eyes at either side of the curved line running through the circle drawn for the head. Make sure the horizontal line runs through the halfway mark of the eyes (picture 5). Draw a small circle in each eye for the pupil.
- Make another small circle for the nose at the cross-section in the center of the head (picture 5), followed by a small line above the nose to show his furrowed eyebrows.
- Draw two triangles with a smaller triangle inside each, for his ears. Then make a curved line above the left eye (picture 6). Erase the crossing lines in the face.
- Next, draw large pointy lines behind the head for his fur and bristles (picture 7). Make some additional lines to highlight the bristles (picture 8)
Step 3
This step gives instructions for drawing the body:
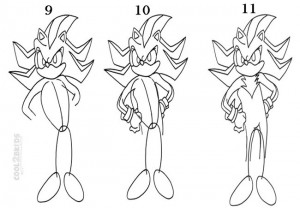
- Replace the pointy ‘c’ with two arms (picture 9)
- Draw two gloved hands in place of the small ovals drawn earlier (picture 10)
- Carefully draw slightly curved lines over the large oval representing Sonic’s body. Then make a pointy neckline (picture 11).
Step 4
You are almost done as all that is left to do is drawing the legs and shoes.
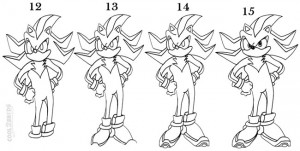
- Draw the legs, like you did the arms, along with the edges of his large shoes (picture 12)
- Next draw the upper sides of his shoes (picture 13) followed by the double-lined soles (picture 14)
Add the final highlights, fill the eyes and nose with black and your picture is ready (picture 15)

